Toby has done a few calculations about the fuel we have used since converting our car to vegetable oil. Check out his site.
Category Archives: Do It Yourself
Paneer
I made my first cheese/paneer this morning and it turned out pretty good. I can buy some really tastey paneer at the local co-op, but it is hard for me to pay $12/pound if I can make it myself! So, here’s the recipe I used:
- 1 Quart milk (I used low fat) warmed on med. high just until it has a good rolling boil (I stir it a good bit to try to keep it from burning on the bottom).
- Add 2 1/2 Tbsp of lemon juice /or vinegar (I used a mix of both) and a dash of salt and give it one good stir.
- Remove it from the heat and let it sit for 15 minutes
- Line a colander with cheese cloth and pour the curds and whey over the cloth. (you can reserve the whey for soups, too)
- Tie the ends of the cheesecloth around the “ball” of curds and hang it over the sink to drain. Leave it over night.
- The next morning, remove the cheese from the cloth and (if needed) wrap it loosely in plastic wrap. Place heavy objects on top of the ball to flatten it out and drain the rest of the water.
- Once it is done draining, put it in a tupperware in the fridge.

I tripled the recipe. My paneer didn’t need to be drained after it was hung up to drip. It came out fairly dry, but still really good. Maybe I will add a little less vinegar next time and see if it will stay together better. I may also try adding some spices, too.
Tonight, I am going to make Palak Paneer (or Spinach Curry):
- 1 C (~4oz) Paneer, cubed
- 20 oz fresh or frozen spinach, chopped
- 3/4 C onions, finely chopped
- 1 tsp. ginger, finely chopped
- 2 tsp. garlic, finely chopped
- 1 green chili, chopped (I am not a fan of spicey food, so I use a few roasted red peppers)
- 1 tsp. Garam Masala
- 3-4 Tbsp. butter
- Salt to taste
- Oil for frying
Heat the oil (for frying) and fry the cubed paneer until light brown. Set aside.
Boild the spinach with ginger and garlic. Drain and puree. Heat the butter in a pan and add the chili (or red pepper) and onions. Saute till light brown. Add the garam masala, spinach puree and salt and cook for ~5 minutes. Finally, add the fried cheese.
Serve with heavy cream and flat bread if desired.
Haven’t pooed in 12 days
I’ve got your attention now, eh?? No, really, I am doing an experiment with my hair called No ‘Poo. And I haven’t shampooed in 12 days. I have washed my hair, I just haven’t used shampoo. See, Toby hasn’t used shampoo in his hair in years and it looks great! It is thick and shiny and he doesn’t have all that shampoo/chemical build up. So, when I read a little more about it, I decided to give it a try. Now, when ever I take a shower, I use a little baking soda and apple cidar vinegar on the ends of my hair, and give myself a great scalp massage. I thought it was going to be an oily mess, but after a few days my hair has already started to adjust. My scalp isn’t over producing oil anymore and my hair has lots of body and wave and looks like it’s been styled. The only thing I don’t like is that it feels heavier. Maybe that will go away after the full adjustment period. We’ll see how it goes. The baking soda and vinegar are supposed to pull out all of the daily build-up of sweat/pollution/etc, but I really use to like sudsing up my hair and the smell of it after using a good fragrant shampoo. But, I also like not putting the sodium lauryl crap in my hair.
Ok, other happenings…
Today in the garden I planted some Cosmos, Sorrel, Fennel, Love-in-a-mist, Cilantro and Arugula (all seeds). I hope all this stuff that I am putting in so early grows well. I could wait a little longer, but I am so antsy to get in the garden that I am taking a risk with frosts and cold weather. I got a report back from the State Ag. Center about my soil and it has a pH of 6.8 and great nutrients and minerals. All it needs is a little more Nitrogen!! Yay!! (Good thing I put in the raised beds with new soil ’cause the soil on our land has a pH of 5.1!!)
So, I am hoping to take a weekend away. Meaning, for the first time since K was born, I hope to get some quality time by myself and leave Toby and K at home. I have put it off for this long since K is still nursing. I didn’t want to force her to wean. But, she is almost two, and I am desperate for some time independant of my little side-kick. I love her, but 24/7 365 days a year is a lot of time to spend with someone! So, what should I do?? Any ideas from my fellow bloggers? My first thought was to head just north of Asheville, and get a cabin at the hot springs up there…
Fasting– Another thing I am desperate for is a good fast/cleanse. I use to do a cleanse every spring. I would either juice for a week or do some form of a cleanse to clean my body out after ‘hibernating’ for the winter. It always felt great! But, with being pregnant and nursing, I didn’t want to fast and have all those toxins get in my breast milk. So, maybe, if K does wean with my weekend away, I will get a good cleanse going. Has anyone ever tried the Master Cleanser Fast? I think I am going to try this one. I like the juice fasts, but they always mess with my blood sugar. The Master Cleanser, is supposed to be different and so far I have only heard good things.
Feng Shui Gardening
We got out in the yard early today and finally got the garden beds put together. I still need to put down more mulch in between the beds, and we need to put up the fence. But, the beds look great, don’t they? Very Fung Shui!

We cut some cedar to make as fence posts. But, the water level seems to be really high in this part of the yard. So, the bottom half of the post hole is just mud. We need to rethink what we are going to use… I guess metal posts.
Most of my seeds seem to be doing pretty well. The kale, lettuce and tomatoes are growing great. (Except my cherry tomatoes). The chard isn’t putting on a great show, so hopefully I can get a few more growing before time to transplant. This is my first attempt at growing from seed. So, so far so good, really.
Well, my body is exhausted from working in the yard all day! I’m off to veg in front of the TV!
Lion, Tiger, and Bear
These past few days have been filled with fun projects! On Thursday night, I got to go to my monthly herb class/meeting! One of the local herbalists holds a monthly class out of her home and this months topic was “Pain and Herbs”. As always, I felt like I had gone home when I was there (does that make sense?). The smell of the fire burning, being surrounded by wise women who were all wanting to open their minds to the power of plant medicine, it was so calming and nurturing! I love these classes. One other fun thing about the class is the samples. As we discuss an herb, we pass around a tincture of that herb and those who want to can taste it. So, as you can imagine, I was without any pain by the end of the night!! We discussed White Willow, Meadowsweet, Kava, and Jamaican Dogwood to name a few.
When I got home from the class Thursday night, I noticed that the neighbor’s sheep (she has 3) were making a lot of noise. I commented about it to Toby as soon as I walked in the door, but thought, maybe they were just braaaaaying at the full moon or something 🙂
Today, we got up early to start working on the garden again. We have been digging post holes and clearing the area for most of the day. As you can see, K and Suki helped.

In the afternoon, my neighbor dropped by to apologize for all of the sheep noise lately. She said she came home on Thursday night to find one of her sheep, Dorothy, had given birth to triplets!! She hadn’t even known that Dorothy was pregnant! (That explains all the sheepy noise when I was coming home from my class) Since the mama’s name is Dorothy, she named the babies Lion, Tiger, and Bear. Tiger was much smaller than the other two and passed away. But, here are Lion and Bear, doing well and growing strong!


One other final fun note… we picked up our beekeeping equipment today! A local beekeeper made our hive bodies for us out of Cypress. So, I am going to give them a coat of my beeswax varnish and hopefully we will have them up and running in the next month!!
Beeswax Varnish
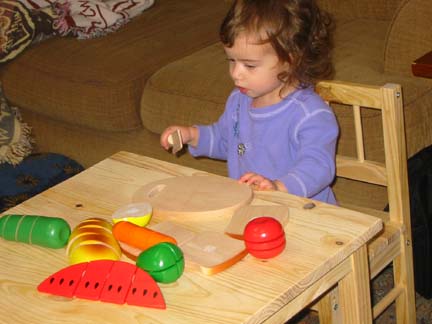
I got K this great little natural wood table and chair set today. Since she will be drawing and playing on it, I want to protect it from getting too marked up. But, I don’t want to put nasty chemicals on it. So, I decided to try this Beeswax Varnish recipe that I have been wanting to try out for a while. Here’s the recipe:
BEESWAX WOOD FINISH (for bare wood)
1 pound beeswax
1 pint turpentine (odorless, if you can find it)
1 pint boiled linseed oil
Melt wax. Remove wax from heat source, then stir in turpentine and oil. Before applying to bare wood, warm the mixture to achieve better penetration. Apply with a soft cloth, let dry, then buff with a wool cloth. Old coats can be removed with an organic solvent such as turpentine. This can also be used on leather. (Another wood finish can be made with 1 pound beeswax and 1 pint turpentine, omitting the linseed oil.)
I quartered the recipe since I didn’t need much. But, it turned out really well. I just varnished the top of the table and it was pretty simple. Just dip the rag in the warm mixture and rub on the table. Then, buff it down after a few hours. (It’s like taking of car wax… you really have to buff “wax on, wax off”)
Here are Toby and K buffing the wax off (Yes, it is nudey time, but she was too cold to take her shirt off 🙂

And here is K enjoying her new table and chairs with some cool wood fruit. The pieces are held together by velcro. So, when you ‘cut’ it with the wood knife, it actually sounds like you are choping vegetables.
Check out this awesome scarf I made for K. I am certainly not a seamstress. So, I am very proud of myself for completing this scarf. And isn’t the fabric great!! It’s so cute!! K hates it! 🙂


Hot Porn Tree
We have cut up a hardwood tree from the front yard and it is ready to innoculate with shitake spawn. I did a little research and figured out that it is an Eastern Hophornbeam. So, I yelled this fact across the living room to Toby, who was in the kitchen washing his hands…”What?? A Hot Porn Tree?? Awesome!!” he said. He is very excited to see what pops up out of this tree:-)
Halloween 2004
We had a jam packed weekend with parties, family and friends visiting, and soap making! On Friday night, we went to a Halloween costume party being thrown by the Biodiesel Co-Op that we are a part of. Toby actually went dressed as one of the head-honchos of the Co-Op and it was hysterical!! He put on glasses, brushed his hair down and wore a Biodiesel t-shirt. That’s Toby on the left 
I was a Flower Fairy and K was a bumble bee. 
 Here she is with her cousin Meredith at the local Halloween Carnival.
Before the Sunday festivities, Toby and I made some soap. We haven’t bought soap in over 4 years!! Our favorite recipe is Pepermint-Poppy Seed Soap. MMmmmm Although, sometimes we put a dash too much peppermint essential oil and it gets a little too tingly for those ‘special’ areas 🙂 I am thinking about making a coffee soap…for those of you out there trying to cut back on your caffeine. Just shower with the coffee soap and the smell with perk you right up!! Like those ‘zest-fully clean’ commercials.
Winter Medicine Making
Every Fall, I try to prepare for the cold and flu season by making some herbal remedies to help get me through the winter. I always make some Elderberry syrup and maybe a garlic tonic…things to nip a cold in the bud. This year, I thought I would invite some people over to share in the fun of making medicines. So, I had a small group of people at my house today for a winter herbal medicine making class. It was a blast! We made a huge batch of Elderberry syrup, some nutritional vinegars, and some herbal cough drops. They all turned out very yummy! Here are the recipes we used if you are interested in trying them out.
 Laura smelling the cooking Elderberries.
 Rachel straining the Elderberries.
 Andrea stirring the cough drop tea and supporting her back (She’s due anyday! :-))
 The nutritional vinegars with Astragalus, Ginseng, Shitake mushrooms, and Umboshi plums.
My car is a vegetarian
We did it!! This weekend, we finished the engine conversion and we are now running our Jetta on straight vegetable oil!! Well, we actually start the car on biodiesel, and once the engine is warm enough, we flip a switch that changes fuel tanks and it runs on vegetable oil. We are talking with some area restaurants to see where we can get some waste oil from. Then, we just filter it and put it in the car. Toby is working on a website detailing the experience. I’ll let you know when it is up.
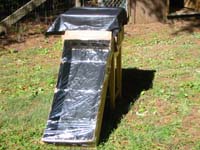
Solar Dehydrator
So, after a rainy summer, overcast weather, and two hurricanes I have finally had a chance to try my home-made solar dehydrator, and it worked great!! Our yard gets very little sun right now…lots of trees. But, the dehydrator was out in the sun from 11 AM until 3:30 PM. I tried drying apples and bananas and in only 4 1/2 hours the dehydrator heated up really well. The fruit was about half dried by 3:30 (when the sun went behind the trees). So, if the dehydrator could gotten more sun-hours, I think it would have been quicker to dry the fruit in the sun than with my electric dehydrator!! (The rack of fruit sat inside the upper box while drying.)


Homemade Butter
I made my own butter last night and it was really pretty simple. So, here’s the recipe:
– Start with ~1 pint of fresh cream. Pour the cream into a quart jar and close the jar, securing well. SHAKE, SHAKE, SHAKE and keep shaking it until it thickens. The butter milk will then separate from the butter…you will be able to see it through the glass when this happens. Shake just a little more. Pour the butter milk into a container and save for future use. I actually poured it all through a strainer and let it drain for a little while. Then, put the butter in a container and, if you want, add a little salt (it will help the butter last longer) to taste. And, Voila, you’re done! Next time, I may add some honey to the final butter, mmmmm.
You know, I’ve never seen goat butter, have you?? I don’t see why it couldn’t be done with fresh goats milk either.
Mr. Fusion
Do you remember in Back to the Future III, when the flux capacitor was powered by Mr. Fusion (a blender that ground up garbage) instead of plutonium??? Well, I am happy to say that our car will soon be running, once again, on garbage!! We have a Diesel VW Jetta and were actually making ‘Biodiesel’ for the car until we moved to Chapel Hill and had to take apart our processor. It’s been hard to have to put nasty diesel into the car after running it on biodiesel, not to mention the cost of diesel!! Well, today we ordered a ‘Grease car’ kit! We hope to have our car up and running on straight vegetable oil very shortly! Basically, we will get waste oil from a local restaurant, filter it, and put it in a seperate tank in the car. The car will be started on regular diesel and once the engine has warmed up (and the vegetable oil is fluid enough), we flip a switch and change the engine over to run on the vegetable oil!! The car actually runs smoother and produces less pollution. The only downside is smelling like french fries 🙂 (Although, I kind of like that smell, but I will probably be hungry all the time.)
Grow Your Own Sprouts
I remember when I was really young, my mom use to make alfalfa sprouts from scratch. I think she had a kit and you just add seeds and water and wait for them to grow. I’ve always loved the fresh flavor of sprouts and the great nutrition you get from them. So, I’ve been experimenting with making my own. (It’s so much more satisfying to eat something freshly grown!) Basically, this is all I did:
1. Put ~ 1/2 cup of beans (I used green lentils but you can use almost any kind of bean or seed) into a 32 oz empty yogurt container.
2. Cover the container with a cheese cloth and secure the cloth with a rubber band
3. Covered beans with cool water and let soak 2 hours.
4. Carefully drain off the water and place the container upside-down on a plate.
5. Rinse beans with cool water twice a day and return to upside-down position on the plate.
6. Your sprouts will be ready to eat in just a few days!!! Keep in the fridge and use within a week.
kufe
The title was supposed to me ‘Life’…but I am trying to learn to type on a new keyboard and I keep hitting the wrong keys…so, instead of life, we have ‘kufe’. I like it.
Well, it looks like our plans to build an addition are being put on hold. We finally got an estimate from our contractor and he thinks it will cost twice what we were prepared to pay!! I don’t understand why a big hallway and empty room should cost soooo much!! Plus, our original plan was to use recycled materials and build as much of it as we could ourselves. But, getting building permits for alternative building structures is hard to do and our contractor kept pushing for doing it the ‘normal’ way. And with me starting school next week and both Toby and I already feeling stretched thin, I really doubt we could put in much sweat equity. We don’t plan on staying here for more than 3-5 years, so investing a big chunk of money to make this house passive solar wouldn’t pay off in that amount of time. If we know where we were going once I get out of school we could buy some land to build on. But, we’re not sure…any ideas on where we should invest in the meantime? As for heating the house passively, we will probably put some water barrels in the south facing windows to hold the suns heat and make some heavy duty shades to keep the warmth in during the winter nights. I’m not sure what we will do about growing food indoors. Our original plan was to have the solar hallway full of planting beds to grow food all year long…maybe we will build some planter beds on top of the water barrels??? We’ll see….
Cooking with the Sun
I bought a ton of tomatoes yesterday so I can dry them. (We don’t have any producing plants yet, since we just moved. But, I did buy local!!) Anyhooo, I have a food dehydrator, but I hate plugging the thing in and leaving it running for hours on end…what a waste of electricity. So, today I built a Solar Dehydrator!! I’m very excited to use it! It was very easy and fast to build and if it works well, I may try to build one out of wood instead of cardboard. I’ll post a picture when I have it up and running.
Toby got back from Asheville last night! Yay!! It’s nice to have him home! While he was there he harvested the last of the garlic we planted last Fall. So, we now have 7 different varieties of hard and soft necks originating from places all over the world!! Cool, eh??!! I don’t know too many people who don’t like garlic (actually, I don’t know any)! (NOTE: If you are expecting a holiday gift from me and don’t like garlic, please let me know :-))
Heat Kills!
Ice Cream! Popsicles! Cold water on my head! Something!! It is So Freaking Hot here!! YES! I said FA-REE-KING HOT! I almost melted walking out of the front door! I took my 1 year old to campus to run some errands (we decided to ride the bus in just to see how long it will take when I start school…bad idea) After waiting in the sun for the bus to arrive, K had already started to wilt. By the time we got to campus, it took every ounce of energy for her just to keep her head up. Poor thing! I ran one errand and decided to call it a day. I’m ready for a little cold snap! (or for Ben and Jerry’s to give me a lifetime supply of ice cream to help me through my summers here…whichever comes first I guess.)
I did run out later to get some groceries. I use to like grocery shopping, but it seems like we have been spending a fortune lately. I am trying to be more health concious and buy organic foods, but the prices are outrageous!! I just don’t get why adding less to your crops justifies charging more for it!! Yes, I understand that there are a lot of things that organic gardeners need to do to get good results with their crops, but $2.97 for a FA-REE-KING avocado?!?!? We use to sell our avocados for $0.20 each when I lived in Miami…and yes, they were organic! I’m going to start growing/making as much of my own food as I can, starting right now! I’m off to make some bread!
Worms and Turtles
OK, the worm composter is officially going. We got some worms from a friend but needed to buy even more. We produce so much food waste it was overwhelming the little suckers. It’s pretty amazing how they immediately go to town on the food. We have a lot of ants that are trying to start their own farm in the composter, though. So, I am going to have to figure out how to get rid of them. I may try some vaseline around the legs of the box so they can’t get in.
My dog, Suki, found a turtle (I think it is a box turtle) in our back yard a few days ago. It would be no problem, except she has decided to use the turtle as a chew toy. Luckily she didn’t harm him. So, today, I brought him to a new area on our property and left him with some treats (greens and a strawberry). Hopefully he will be OK.

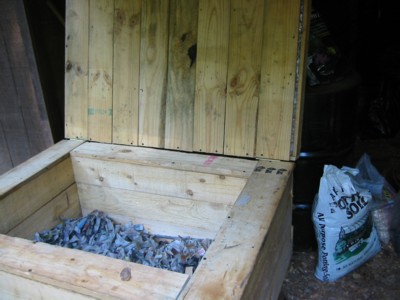
Worm Composting
This past winter, my brother-in-law made our family a worm composter. I’m not sure where he got the plans, but it is really cool! It is a 4 x 3 x 2 wooden box with a screen underneath to sift out the castings once the food scrapes has been ‘wormified’. It also has a heater built in to keep the worms warm in the winter. I am finally getting around to setting it up and will be getting some worms next week!! I can’t wait to start recycling my food scrapes instead of throwing them away!
The last link is how I found my worms! The woman I spoke with in the Education and Outreach Dept. has worm bins herself and said she would let me have some of hers!! She is also coming out to see the bin that my brother-in-law made, because she has never seen anything like it.