Head on over to Small Measure if you’d like to try to win your own Tea of the Month Club membership from Ninja Chickens!
I’m off to make some decadent lip balms for the store.
Head on over to Small Measure if you’d like to try to win your own Tea of the Month Club membership from Ninja Chickens!
I’m off to make some decadent lip balms for the store.
Around our house, it’s very common to find one of us crafting or creating something at almost any point in time.  Blending up soaps and teas, knitting/sewing clothes and toys, carving spoons and turning bowls, making herbal medicine, drawing, painting, glueing, hammering….. If it’s “Do It Yourself”, we will try it  (and even if it’s not, we might try it! Oy!)  We just can’t help making stuff around here.
So, I felt it was high time we open up a little store to showcase some of our craftiness. Â We’ve started small but we plan to add more herbal, knitted, and homesteading item. Â (I’m hoping to get Toby to list some of his beautiful carved bowls in there.) Â Drop in and take a look!! Â And tell your friends!
One of the things I’m most excited about in our Etsy store is our Tea of the Month Club! Â There’s a 3-month, 6-month, and 12-month membership. Â Each month, we send out a new blend of delicious herbal tea. Â I’ve been working on recipes for a few months and they are all so tasty!! Â I’m having a problem keeping the kids out of my December blend (yes, there is cocoa in that mix)… they just keep asking for more!
Kaia and I got back from our 9 day AZ trip late Wed. night.  We saw some stunning sites, met some wonderful people, and had the most amazing time together!  Our original purpose for traveling was to go to the Herbal Resurgence Conference. But, we couldn’t go all the way across the country and not explore a bit!
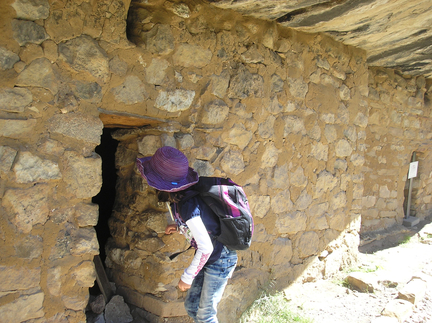
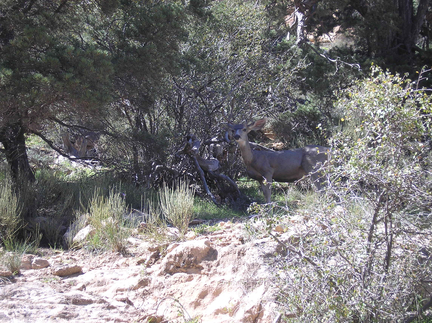
The first day we were there, we spent time at Walnut Canyon. Â It’s a relatively small canyon compared to some of the others in AZ, but it is home to many ancient cliff dwellings of the Sinagua people.
Just a short hike into the canyon you find evidence of community life from a thousand years ago.
Rooms were built around rock that had been carved out by ancient rivers.
Back in June, I asked Kaia what she wanted for her birthday. Â She went through a few ideas before settling on a tree house. Â “Yes!” I thought. Â “We definitely need one of those on the land!!” Â And so the construction began:
Leif, as always, was a fabulous construction helper!
There was a lot of excitement when the platform was finally done! (They don’t look excited, do they? Â It had been a long day of construction, with lots of mosquitoes.)
The house is shaped like an H surrounding two large trees.
The siding was made out of donated tin roof and lap siding. Â It created a fabulous mash of colors and personality.
It took a while, but thanks to the help of our family, we are pretty much done! Â A rope ladder and pully system are planned for the near future. Â But, Kaia was able to move in today and is looking forward to some quiet time by herself. Â (We’ll see what her little brother has to say about that!)
Kaia and I recently began reading The Omnivore’s Dilemma – Young Reader’s Edition. Â She wasn’t super interested when I mentioned it, but she was hooked after the first chapter. Â The first 100 pages discusses the industrial food system from farm to store, focusing on corn. Â Kaia was amazed by how common corn is in our lives, not just in food, but in medicines, packaging, glues, paints, cosmetics, antibiotics, and so much more.
We decided to take a trip to the local grocery store with a list of corn products, just to see what we could find.  We walked down the aisles picking things at random.  Out of 30 products, there were only 5 that did not contain corn:  two varieties of  crackers, Enjoy LIfe Chocolate Chips, some gluten-free wafers, and a B-12 supplement.  In the other 25 products we found corn and its by-products 106 times!!!!!  We found it in things like pineapple juice, mayonnaise, Cheerios and other cereals, non-dairy creamer, pet treats as well as cat food (cats are obligate carnivores and should definitely NOT be eating corn!), fish sticks, wet walnut toppings, candy, crackers, frozen burgers, BBQ sauces, peanut butter, TV dinners, ice cream, baby tooth paste, icing, chili seasonings, gluten free ice cream cones and bread mixes, Centrum vitamins, and in jelly (4 different corn by-products in this jelly)!  All of this and we only made it half way through the store when we decided to stop.
WOW! Â Â Just WOW! Â So, how many of these things really need corn in them? Â Have you ever made home-made ice cream with corn? Â What about jelly? Â Doubtful! Â Corn is shoved into just about every processed food! Â And that’s not even counting the corn that is used to feed the cattle, pigs, and chickens that produce the meat and eggs in the store, or the ethanol that’s used transporting some of these products, or the corn starch used to make some of the packaging, or the corn used to make the glues to seal the packages!
Our country has gotten into a vicious  cycle of over producing, over subsidizing, and over consuming corn.  (King Corn is a fabulous documentary if you want to learn more.)
From the list we brought to the store, we found corn in the form of: ascorbic acid, coloring, cellulose, citric acid, corn, corn meal, corn oil, corn starch, corn syrup, high fructose corn syrup, dextrose, flavorings, hydrolyzed vegetable protein, malt flavoring, maltodextrin, polydextrose, polysorbates, sodium citrate, sucralose, tocopherols, and xantham gum.
If you’d like to take a look in your local store, or how about in your pantry, here is the list we used to get us started.
I posted a picture of Kaia’s fabulous doll creation on Facebook and a FB friend, that I’ve never even met in person, was so impressed with Kaia’s ambitious sewing project that she sent Kaia a care package. Â The package had doll making books, supplies, and even a hand made bunny! Â Kaia was so excited that she got to making one of the dolls immediately.
The pink one she made for herself and the yellow one she gave to her dad for his birthday. Â The little bunny was given to her in the care package. Â Aren’t they cute?!?
So, then I was inspired. Â The patterns in the book are so cute that I wanted to try to make one of my own.
Please meet The Dimples
 They are super easy and quick to make.
Here is the pattern (two pages) to download if you’d like to try one:Â dimple2Â Â Â dimple3
First cut the pattern and choose your fabrics. Â Pin your pattern and cut your pieces out. Â I used felt for the body and cut it with pinking shears. (Make sure to read through the instructions first. Â There are different ways to sew up the doll depending on if you are using felt or not.)
Be sure that you cut your legs and ears so that they match up. Â You don’t want two left legs…
Lay out your pieces to make sure you like the fabrics you chose.
Once all of your pieces are cut, you will start sewing by attaching the face to one of the body pieces with a very close zigag stitch on your machine, or you can do a satin embroidery stitch. Â You will do the same with the eye and the heart. Â Using contrasting thread colors to make them pop.
Next, embroider on the face and attach a button for an eye.  I used a basic back stitch for the mouth and blinking eye.
Next, pick a contracting color of embroidery thread or yarn and make a wide whip stitch around the face.
Next, you will sew up the legs and ears. Â Place the right sides together and stitch around, leaving 1/4 ” seam allowance. Â Make sure you don’t sew all the way around. Â Leave a space where they will be attached to the body to turn them right-side-out and stuff them.
It helped me to use a chopstick to turn them right side out.
Trim the corners of your ears before turning them out.
Then stuff them leaving the end open.
Pin your pieces together making sure the ears and legs are tucked nicely between the front and back body pieces.
Sew it all together using a straight stitch in the same color as the body, and leaving an opening at the top to stuff.
Stuff your doll and sew it up, either with a straight stitch on your machine or by hand.
Now, if you want to use cotton fabric (or a non felt) you follow the directions exactly the same until it comes to sewing the whole thing up. Â You will need to lay it out with the ears and legs on the inside with the edges lined up, like this:
The ears and legs are place up on the top body piece and then the back body piece is placed, right side down, on top. Â Pin it well and sew it up leaving a space for stuffing and pulling everything right-side-out. Â Does that make sense? Â Here it is, ready to sew, with legs and ears tucked inside.
Stuff, and hand stitch it up with a whip stitch.
The pink one was made as a birthday gift. Â Of course, Leif and Kaia wanted one, too. Â Leif’s has an X eye, instead of a blink.
What do you think?
The kids and I headed out to one of our many local orchards yesterday and picked the heck out of some peaches and asian pears. Â So, today, guess what we’re doing?
Cinnamon Spiced Pears
And Ashley English’s Spiced Pear Chutney almost ready to go into the empty jars. Â (I love the look of the blue jars!!)
What I’ll need to tackle in the next few days:
Spiced peaches, brandies peaches, peach cobbler… what else? Â Anyone have a nice recipe for a peach shrub??
While I was working away in the kitchen the house became very quiet. Â Knowing that the kids might be getting themselves into a lot of trouble when they get quiet, I was thrilled when I walked out of the kitchen to see this:
What have you been canning up lately?
Kaia has been asking to do this doll project for a few months now. Â I thought, instead of starting the new school year a little early, I’d put aside the last week of summer for her to make her doll. Â Often times, with sewing projects, she will start off with great gusto and then dump the project in my lap begging me to finish it. Â This time, she took off and ran with it. Â Not only completing the doll, but accessories, too.
Beginning the first arm
Voodoo doll!
Stuffing the legs
Button hips and brown boots
Sometimes others fall in love with our creations
And sometimes we get side tracked by cuteness
Pinning on the first layer of hair
Hair’s done (Crazy Happy!)
I did help Kaia by sewing on the face. Â But, while I did that, she made Caroline a dress and accessories.
Caroline now has a purse, book, pencil, and saddle bag with snack pack, apples, water, and a burlap bag of oats for her horse.
Stay tuned! Â Movie episodes of Caroline in “My life as a doll” are in the making!!
I have to admit, I’m not usually a fan of late summer. Â Aside from being super hot and muggy, it usually arrives with that feeling of overwhelm. Â The garden bugs, the harvesting, the processing, the weeds… And it’s just SOOO hot!
But then there are things like this that remind me of the beauty of this time:
The Elderberry Harvest has begun and this year the bushes are drooping with dark berries!
Last year I made a huge batch of Elderberry/Raspberry Mead, canned peaches and raspberries together, and made lots of Elder Syrup.
What are your favorite things to do with elderberries? Â Any fabulous pie recipes out there?
We took a spur-of-the-moment trip to the beach this week. Â Had to get away from the constant rain we’ve been having. Â Seriously! Â It’s been constant. Â Last week we actually passed our average amount of rainfall for the year. Â And the year is only 1/2 through! Â It was nice to feel the sunshine again and to play outside. Â Though we came home to more rain, I’m feeling refreshed enough to appreciate my home in the rainforest again.
Both Kaia and Leif get more confident with their water skills each time we visit the beach. Â It was great to see Kaia diving under the big waves. Â She couldn’t get enough of her new boogie board.
Leif, of course, rolled and dug with his trucks until the sun went down. Â But, he also had his fair share of boogie boarding and jumping over ‘scary waves’.
Loggerhead Turtle tracks!!
And her nest!! Â She came up onto the beach the first night that we were there!
Sorry for the blogging hiatus. Â Things have been busy at the homestead, as usual. Â The garden is bursting, the school year has finished up, I’m continuing to move along with aerials… but what’s really taken up a lot of time and emotions is Kaia’s kitty, Oreo. Â Back in April, we noticed that Oreo was not his normal self. Â He seemed depressed and lethargic. Â We took him for a check up and discovered that he had FIP (Feline Infectious Peritonitis).
For those of you who have never heard of this awful virus, I hope you never have to get to know it personally. Â It is a 99% fatal virus that attacks the kitty’s immune system. Â For the last two months there have been special foods, syringe feedings, IV fluids, many medications, and lots of love. Â Oreo fought a hard fight, but he crossed the Rainbow Bridge last Friday. Â It was a sad time for all of us, but especially me. Â Oreo and I had bonded and I will miss his sweetness. Â I still tear up thinking of him. Â It’s so hard to feel so helpless when someone you love is sick.
And in the midst of all of this, my baby girl turned 10!
That’s double digits!!! That’s starting puberty!! Â That’s pre-teen! Â Holy cow, how time flies!! Â I asked my girl what she’d like for her birthday and she quickly replied, “A Treehouse!!!” Â Sweet! Â We can do that! Â So far, we’ve (Toby and his dad, really) gotten the platform done. Â It’s been raining cats and dogs here all spring. Â But the walls and roof will go up as soon as the sun starts shining again. Â Then, I may have to kick Kaia out of the tree house so I can play!! 🙂
Friends of mine recently gave me some Ashwagandha, Arnica, and Sochan.  They are wonderful medicinal herbs, but I’ve never gotten to know them well as live plants.  So, I decided  I’ve finally acquired enough odd plants that I am in need of garden labels.  This past weekend, I went out to the Good Will and rummaged through their utensils bins.  I bought a large variety, but it’s the cheap spoons that were the easiest to hammer flat.  I pasted the labels on with Modge Podge, and coated it with an outdoor varnish.  I’ll let you know how they hold up.
I have an ongoing list of sewing projects that has been sitting on the sewing table for months. Â This weekend, with some “me time” for mother’s day (thanks hubby!!), I was able to whittle down the list a bit.
A square skirt for Kaia (if your daughter has a twirl requirement of her skirts, this is a definite must!)
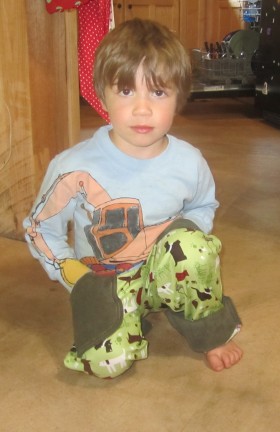
And a few pants for Leif. (He goes through them so fast. Â Being the track-hoe that he is, the knees of his pants take a beating.)
He insisted on lifting his shirt so you could see the waist band.
Then he insisted on a kneeling pose 🙂
Next on the list, some new undies for Leif and a square skirt for ME!
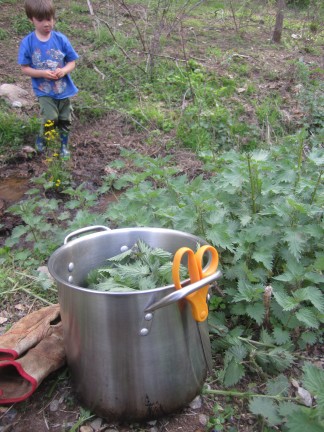 Ok, you don’t even have to use Nettles! Â You could use spinach or any other leafy green. Â But, nettle was what I had on hand and boy was the result delicious!! Â (You see the big bottom lip in the picture above? Â I’d just told him I didn’t want him to pretend to be a track-hoe in the stream. Â Bad mommy trying to keep him clean for dinner:-)
I’ve tried out so many nettle soup recipes, only to be disappointed. Â They were either too bland or too watery or just didn’t leave me satisfied…. until this one! Â Not only did I like it, but the hubby and both kids did, too!! Â Win-Win!
So, here’s what you need:
Nettle Sausage Soup (adapted from this recipe)
I think this is going to be one for canning up to have on hand year round!! Â Delicious!
The soil in our garden area is pure clay. Â Seriously! Â Red and solid! Â We put in raised beds when we built the garden area a few years ago. Â Still, I’ve had no luck growing root vegetables. Â So, this year, we built a root bed. Â We used what we had on hand (roofing tin and pipes) and constructed a three tiered bed for our beets, carrots, burdock, and maybe dandelion.
Leif insisted on helping by making thunder noises while running over the roofing tin (over and over again).
Then, he became a backhoe, which little 4 year olds can do, and dug out the root bed area for us.
So far, I’ve seeded the beets and carrots. Â With all this snowy weather, nothing has popped up yet.
We also purchased some 55 gallon drums to make into strawberry and potato beds. Â The barrels were cut in half and drainage holes were cut into the bottom. Â For the strawberries, Toby drilled large holes in the sides of the barrels for the strawberry plants to grow from.
I’ll put the strawberries in as soon as we get a litter warmer weather.  I may put a borage (one of strawberry’s companion plants) on top of each strawberry barrel, too  The potatoes should be here in a week or two.
I’ll let you know how they all work out!!
We had a gooey time last week putting together these adorable cloth baskets. Â We followed these instructions, only altering them to make the baskets a bit deeper, and using Modge Podge as the final coat of glue.
Leif tired of the messy, gluey hands very quickly, but continues to pick out fabric pieces for me as I glued them on to his balloon.
After we covered the balloons thoroughly with cloth and glue, we hung them to dry by the wood fire.
When it was completely dry, the kids popped the balloons and removed them from the bowl. Â I WISH I had gotten a video of this. Â The sound that the balloon made as it slowly released itself from the bowl was like a build up to an implosion. Â This sucking sound that made you think the bowl would collapse down to nothing. It was so crazy we all went wild when it happened!
We punched holes in the sides and strung on the ribbon handles… and wore them as hats!

It just so happened that the day after we made these, we headed to a fabulous party, hosted by the also fabulous Ashley English, in celebration of eggs. Â (She is working on her sixth book due out in 2014. Â This one is going to be about handmade gatherings and celebrations, and from the fun our family has had at these parties, this book is definitely going to be a keeper.)
There were, of course, egg hunts! Â Egg hunts in the bamboo forest…
Egg hunts in the gardens…
Egg toss and egg rolling competitions.
Silk egg dying (Yes! Â You are looking at a hard boiled egg silk dyed with an old neck tie that had elephants on it!!)
And a table spread fit for a king! Â Everything was either made with eggs or had eggs in the title 🙂 Â We brought a pumpkin flan (yes! Â It was paleo)!!
And, to top it all off, a magnificent, melt-in-your-mouth Pavlova! Â (Ashley, this recipe had better be published, because it alone is reason to get the book!!)
(Folks, there were actually two decadent desserts at the party, one made by Ashley and the other by Dan and Jael of the French Broad Chocolate Lounge, and neither of them had wheat!!!  What a treat!!)
“Just one more chocolate, mom??!!”
And when we got home, it was time to organize the booty. Â (There are three more silk dyed eggs here, too.)
And, in celebration of the egg, my ladies wanted to let you know how hard they are working now that it is spring.
Hope you had a lovely weekend!
AKA – Quick Entertainment for The Whole Family
Kaia got this idea from some friends of hers…. all you really need is a vibrating tooth brush, a nail or vegetable brush, and a rubberband.
But, it’s even more fun if you decorate a bit with giant pipe cleaners and googly eyes.
Just rubber band the toothbrush to the nail brush, turn it on, and GO!
We continued our studies of Sacagawea and the Lewis and Clarke Expedition this week with some basket making. Â We used a kit from a local craft store. Â It was said to be ‘easy to use’. Other than a bit of prep work (measuring and cutting the reeds, and dying a bit of it blue), it really was fairly easy to do.
The kit came with enough to make two baskets. Â So, I made one for Leif while Kaia made hers. Â Mine was much easier to make. Â Mainly because I didn’t have a kitten trying to attack the moving weavers, or jump into the basket every chance he got.
We’d like to get to fire making soon, but I’m hoping for a bit warmer weather first 🙂
My plan was to move farther into the 1800’s with our history studies, but Kaia found a book on Marie Antoinette that she really wants to read. Â So, we are stepping back to the French Revolution for a bit.
The kids and I have been having a hard time following any history curriculum. Â It seems like there are too many names and dates and too little hands on experiences. Â We find ourselves yawning. Â So, we put the curriculum aside and decided to do some living history. Â We’ve just wrapped up the American Revolution and are now learning about Sacagawea. Â The book we used was mostly about what her childhood might have been like, with a few chapters at the end about her travels with Lewis and Clarke. Â The book discusses basket making, salmon spawning, leather working, fire starting, and other skills that are fabulous to work into a homeschoolers day! Â We watched a great video on the life cycle of salmon, and I may pick up some salmon to cook over an open fire, or even try drying into jerky. Â Kaia was most interested in leather working. Â So, we got some scraps and she created different types of pouches.
She made a simple circle pouch:
And Leif helped me make one for him:
Then Kaia did a flap style purse out of some buffalo skin:
She and I both love how this one turned out!
They also worked in a full afternoon of playing in their teepees, ‘hunting and fishing’, and trading with the tababone (“white face”).
We wrapped it up with a fish craft:
Next week, basket weaving, fire starting, and a documentary about Lewis and Clarke!
Every year, for my kids birthdays, I make their cake… whatever kind of cake they want. Â I’ve made unicorn heads, construction sites, Ariel the mermaid sitting on an island floating in the water, and more mermaids….. you name it. Â It’s always a fun challenge. Â But, this year when Leif requested a Perry the Platypus cake I was stumped. Â How was I to recreate a little platypus with aqua blue fur without using artificial food coloring? Â There is just no good natural blue. Â Cabbage can be boiled down, but that ends up being more pale blue/grey. Â Blueberries are actually purple. Â Then I found these: Â Butterfly Pea Flowers. Â They grow on vines native to Southeast Asia and are known for their vibrant blue color. Â When steeped in hot water, they color the water a beautiful blue… the perfect blue for Perry the Platypus.
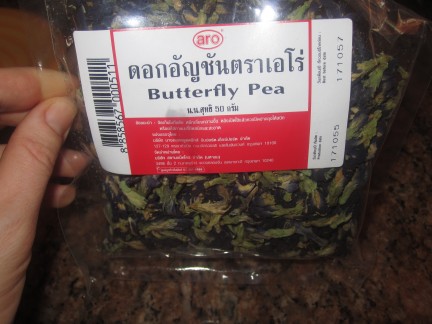
My hope was that the flowers could be infused in oil, too. Â Then I could infuse some coconut oil and use the oil in the frosting. Â But, no such luck. Â The color didn’t transfer to the oil at all. Â I heated them in coconut milk and got a light blue, but not the striking blue I was looking for.
So, I decided to infuse them in water, making a very dark blue with lots of flowers. Â I put this blue water over about 6 cups of coconut. Â I used enough water to coat the coconut, but not drown it. Â Then dried the coconut in the oven at 130 degrees stirring it every 30 minutes. Â I think it took about 3 1/2 hours to dry out completely.
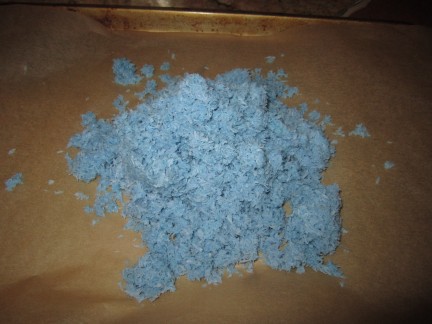
Blue coconut!
And while I was soaking things in this lovely blue water, I decided to throw some hard boiled eggs in there. Â I soaked these for 2 days before the birthday party so that I could make some blue deviled eggs!
Here are a few other pictures of the process of creating Perry:
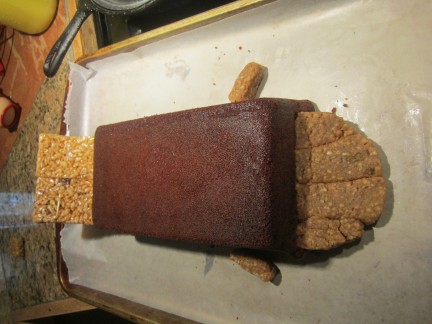
Here’s the pre-frosting set up. The front limbs were also made from Sunbutter bars and the feet from peach gummy candies.
And here’s Perry. Â I put some of the coconut in the frosting as well as coating the whole cake with it after it was frosted. Â It’s certainly not as blue as the real Perry, but I think it turned out pretty dang good!
Leif was thoroughly satisfied with his cake!
Oh, and with his blue eggs!
Crossed the rainbow bridge after 15 years of faithful friendship and love.
August 25, 1997 – February 21, 2013
Max the Marvelous and Magnificent…
 …was never opposed to being carried around.  In fact, he preferred that his paws never touch the ground
…was a fabulous snuggler
…was a very snappy dresser
… was never afraid to speak his mind
…endured was with us through two home births

Watching from the bathroom as we weighed Kaia in our room.
…knew how to relax
… was fiercely protected by his lady love
(sometimes, a little too fiercly)
…had a great sense of humor
… chose me to be his mother

When I was deciding which kitten to adopt, Max climbed up my shirt and flopped down into my hand, purring, and promptly fell asleep. I knew he’d claimed me as his. He was a little over a month old.
I already miss you dearly , Max!!
We seem to have no trouble filling our days with fun indoor activities while the weather is cold outside. Â I’m glad. Â I don’t care to hear the kids moan, “I’m bored!” (I’m sure my mother felt the same way about me 🙂
We’ve been writing letters and numbers in shaving cream on a cookie sheet….. and on his pants, and on his arms, and on his sweater, and on his socks…. (Kaia got into it, too, writing in cursive).
Right now, it’s actually easier for her to write in shaving cream than on paper. Â The kittens are a little too interested in her wiggling pencil.
Kaia and I took a spinning class a few weeks ago and I’m having a blast practicing. Â A friend let me borrow her wheel and this is what I made today. Â It’s my second skein. Â Next, Leif says I have to spin some bright blue yarn so I can knit him a Perry the Platypus hat.
and when I have a belly ache, my belly says, ‘I need chocolate truffles!!'”
(See yesterday’s post on the Truffles from Hell!)
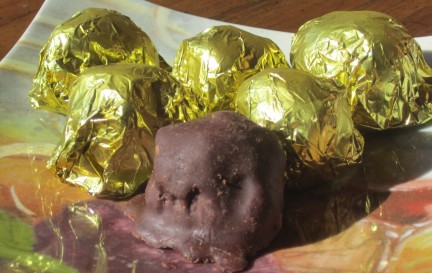
Why are they hellish, you ask? Â Because you won’t be able to stop eating! Â Seriously!! Â Five pounds added to the hips in the last few days, my friends!
So, you still want the recipe? Â OK. Â If you say so.
Truffles from Hell!
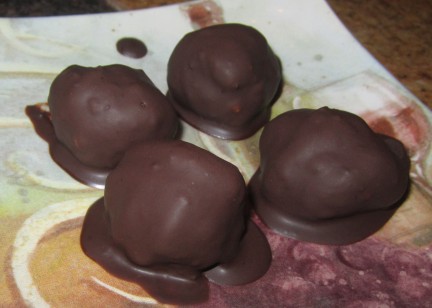
Last year, I really slacked on the garden. Â I guess I was just tired of doing it all myself and wanted to focus on other things in the warm weather. Â I learned that having a not-so-great garden was just as much work as a full garden. Â So, this year, I’m picking up the pace and even growing some new things, too. Â I hope to encourage the kids to spend more time in the garden with me, and let them pick out some things they want to grow.
On the list to add to the garden this year is:
Have you ordered your seeds or planned your garden yet? Â What are you going to be growing?